Detail Props on World Spawn, Start to Finish.
We’ve all seen those grass details on various maps and wanted them to be on our maps as well. Good new! You’re going to learn something today, how to create a sprite card, and make all the necessary items to make this work.
Lets go over what you’ll need for this:
- Hammer Editor
- VTFedit
- NotePad++ (Not needed, but recommended)
- Photoshop (GIMP should work, but I don’t know how to use it all that well. NOTE: I will NOT be supporting any questions about using GIMP for this.)
- Common knowledge, and about 45% of a normal sized human brain.
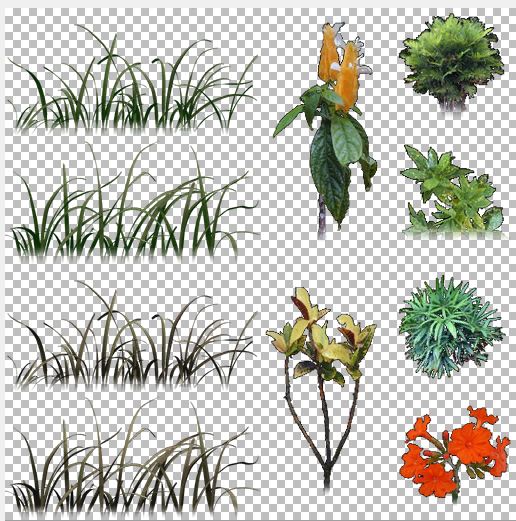
Well lets get started, you’ll need to make a sprite card for you to use. I’ve already gotten my hands on one from Dark Artz Entertainment, thanks for the image guys.
There are a couple rules whilst creating this image that MUST be followed.
- It must be a square image, unless you are shipping your own mode and have access to code. (EX: 512×512, 256×256, 1024×1024)
- There must be at least one pixel between each item you a have on the card.
- Place your items on a grid like formation, like I have on mine.
- Make sure to have the image be transparent
- Gradient fade out the bottom of each item using the alpha channel. (See the black and white image, that is the alpha channel for the image.)
 Now we will create the VMT for the sprite card. I’ve already done the heavy lifting, so I’ll just give you guys the code. Place the VTF and VMT into “materials/detail” and use the following:
[php]UnlitGeneric
{
$translucent 1
$baseTexture "detail[VTF NAME]"
$nocull 1
$vertexcolor 1
$vertexalpha 1
$receiveflashlight 1
$singlepassflashlight 1
}[/php]
That will do it for the VMT side of things.
Next we will set up the detail.vbsp file that will define the rules for placing these props. I heavily recommend using NotePad++ for this part, because it shows you what brackets are connected. Start by creating a new text file in the root directory of your game. (EX: for counter strike source the path would be, steam/steamapps/youraccount/Counter-Strike Source/cstrike/detail.vbsp) Name the file mydetail.vbsp, the default name is “detail.vbsp” if used it will be used over the stock one. You can name it what ever you want though.
Add the following to the newly created VBSP file:
[php]detail
{
Detailtype
{
density [float]
Group#
{
alpha [0-1]
Model
{
[settings]
}
}
}
}[/php]
Now let me clear up some of these things for you guys, it’s all pretty simple after you know what you’re looking at!
Where it says “Detailtype” this is what you would name the group you are about to create. So I’m going to walk you through placing some simple grass sprites on the level, I’m going to use “Grass_Green_lvl1”
Density is how thick the sprites are placed, a good starting value is 1500. For you tech specific people, here is the formula for how often they are placed: surface area * density * 0.000001 (density 1000000 means one detail prop per unit. Values of 1000 to 1500 are generally used.) So lets use 1500 for this.
Group# is what group you are telling it to place props in, you can have many groups in the same detailtype.
Alpha is a value 0-1, where it is the alpha on the displacement that the detail is being applied on. So say you have a grass texture, and a dirt texture on the same displacement. So you can have different sprites depending on the alpha.
For model you can put almost anything. I name them Model1, Model2, Model3, ect.. and then drop comments next to them saying what they are. (EX: Model1 //GrassSprite1, top left)
Settings is where stuff gets kinda hairy… Once again I’ll try to make this as painless as can I can. I’ve put the most commonly used settings in example, and commented out what each one does. For more information on what does what, and more commands visit the VDC at: http://developer.valvesoftware.com/wiki/Detail_props
So where “[settings]” is paste the following:
[php]"sprite_shape" "tri" // you have 2 choices: "tri" and "cross" Comment out this line for 1 sprite
"sprite" "0 0 256 256 512" //start at 0,0…256,256 is size of box in material, 512 is material size. (0 0 is the pixle starting from the top left. 256 256 is its size from the starting point.)
"spritesize" "0.5 0 5 5" //The origin (U/V) and size in units (W/H) of the sprite when it is in the world.
"spriterandomscale" "0.2" //randomness of sprite sizes
"amount" "0.05" //The proportion of the group that this model (or sprite) will account for. If the amount values of a group add up to less than 1, fewer detail props will be emitted than specified by density.
"detailOrientation" "0" //1 faces player. 0 would not rotate. 2 faces camera.
"shape_angle" "20" //degrees of tip/flare, TRI SHAPE ONLY
"shape_size" "0" //0-1 percent of sprite width to separate each leaf, TRI SHAPE ONLY (Percentage of the sprites’ width to put between them and the centre of the triangle. 0 means that the sprites cross at the prop’s origin.)
"sway" "0.2" //0-1. 0 doesn’t sway much, 1 sways a lot[/php]
I’ve found that these are some really good starting values for your own stuff. So read the commented out parts, they will tell you EXACTLY what each thing does in a quick sentence or two. But I’ll go over some of the more important here.
Sprite is what image it will display. It took me a bit to figure out how to make this work correctly. I’ll show you the easiest way to locate the values for this. Start by opening the image in Photoshop, and enable the “Info” window (Hotkey F8). Once enabled you should see something like this:
Now you’ll want to use guides to block in the sprite you want the XY values for, it’s best to do this on the alpha
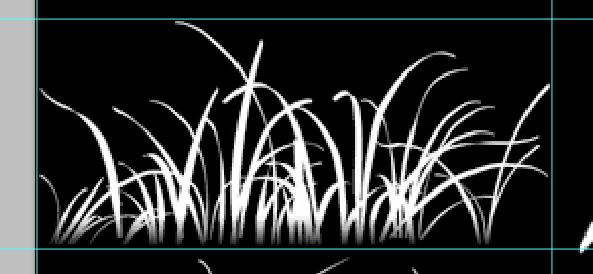
channel. To make a guide, click on the ruler and drag down onto your image. Next right click on the ruler and set it to Pixels. Now zoom in and place your cursor on the top left pixel that you have boxed out, you’ll see the XY value change on the info box. Use those two numbers for the first 2 numbers on the “sprite” setting. So now we have: “Sprite” “1 15 256 256 512”
Now you’ll need to find the exact size of your sprite, use the marquee tool to find this. Make the marquee box around your sprite
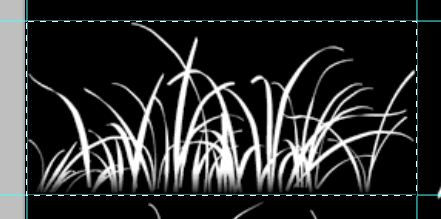
like if you were going to cut it out of the image. After that selection has been made the info box will show the total amount of pixels you have selected. Put these numbers in where we have 256 256. So now we have: “Sprite” “1 15 253 113 512”
Now that we have that done, we can move onto “spritesize” “0.5 0 5 5” the first number is how high the sprite is raised up from the ground, 0.5 is a pretty good starting value. The last 2 numbers are its size in the world after placed in X Y. I start with 5 5 and then mess with it from there.
After some hard work I’ve created this:
[php]detail
{
Grass_Green_lvl1 // To use this set your detail sprites to: Level1_sheet
{
density 1500
Group1
{
"alpha" "0"
Model1 //GrassSprite1, top left
{
"sprite_shape" "tri"
"sprite" "0 0 259 125 512"
"spritesize" "0.9 0 40 20"
"spriterandomscale" "0.2"
"amount" "0.3"
"detailOrientation" "0"
"shape_angle" "12"
"shape_size" ".1"
"sway" "0.2"
}
Model2 //GrassSprite2, 2nd from top
{
"sprite_shape" "tri"
"sprite" "0 128 259 128 512"
"spritesize" "0.9 0 40 20"
"spriterandomscale" "0.2"
"amount" "0.3"
"detailOrientation" "0"
"shape_angle" "12"
"shape_size" ".1"
"sway" "0.2"
}
Model3 // Middle, 2nd from top
{
//"sprite_shape" "tri"
"sprite" "226 136 107 109 512"
"spritesize" "0.8 0 12 12"
"spriterandomscale" "0.4"
"amount" "0.2"
"detailOrientation" "0"
//"shape_angle" "12"
//"shape_size" ".8"
"sway" "0.1"
}
}
Group4
{
"alpha" "0.3"
}
}
}[/php]
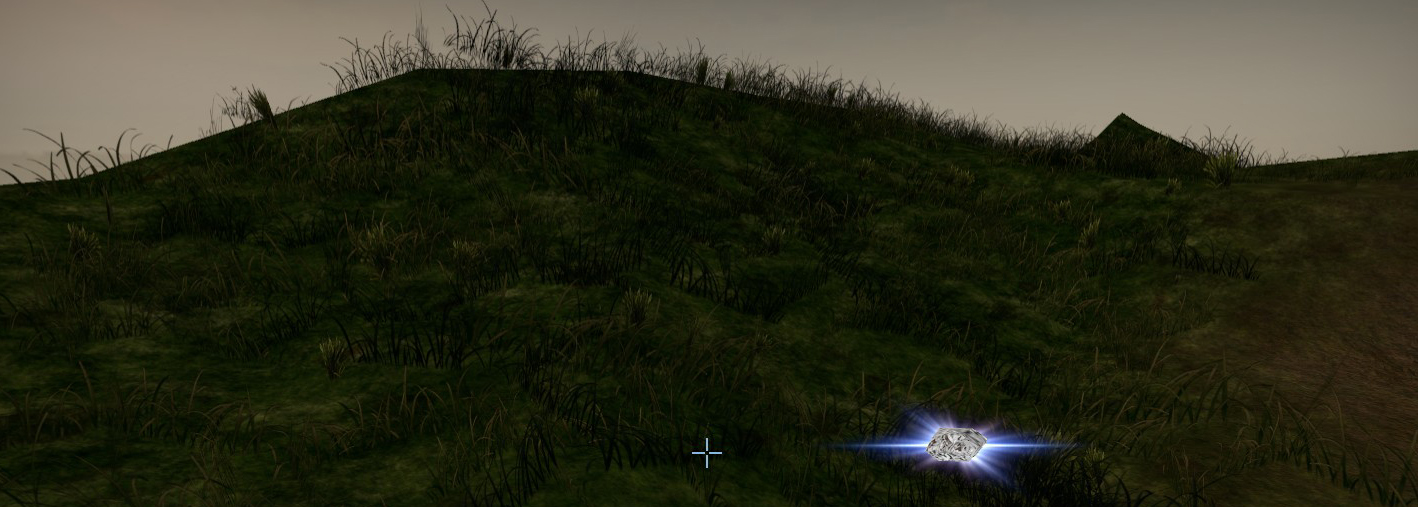
With these settings you will get results like this:
Now to apply this to a texture just open the VMT for that texture and add this: “%detailtype” “Grass_Green_lvl1” (Replace “Grass_Green_lvl1” with your detailtype)
EXAMPLE:
[php]"WorldVertexTransition"
{
"$basetexture" "RealWorldTextures2/Ground/grass_06"
"$basetexture2" "RealWorldTextures2/Ground/dirt_01"
"$bumpmap" "RealWorldTextures2/Ground/sand_12_nrm"
"$bumpmap2" "RealWorldTextures2/Ground/dirt_03_nrm"
"$surfaceprop" "Grass"
"%detailtype" "Grass_Green_lvl1"
}[/php]
And that just about wraps it up. You’ve just created your very own detail sprites!!! Hope this helped you guys with something super simple, that looks really advanced!
You also have to tell Hammer to use these textures, and VBSP file. To do so just go to map>map properties and give it the correct names for the VBSP file and the sprite card
Any questions comments or improvements are always welcome.

